Who likes to drink one or two good wine, its wine is probably not going to store in any box or a simple wooden box, but prefer a proper style and secure storage space.
Now, it is not necessary to spend a lot of money for a stylish bottle or wine rack, because instead it ready for sale, the handyman can build his wine rack also himself. This results in passing even the advantage that the wine rack can be built in the size in which it is actually needed. In this way, for example, also be made a small shelf that can fill an unused corner of the living room or dining room or in the kitchen. In addition, the handyman can always build another, identical shelf when his wine collection has increased. An idea for a wine rack to make your own presents the following instructions. Here this rack is designed for 30 bottles of wine. It is of course possible, however, the wine rack to build larger or smaller. In this case, the bill of materials must be only amended accordingly.
A wine rack build yourself - that is needed:
10 wooden slats, 46 x 3 x 2cm
30 rods with 1.5cm diameter, 28cm long
2 glued panels, 70 x 30 x 3cm
Wooden dowels and wood glue
Drill with stop
Build a wine rack itself - how it's done:
1st step: Prepare the wooden strips
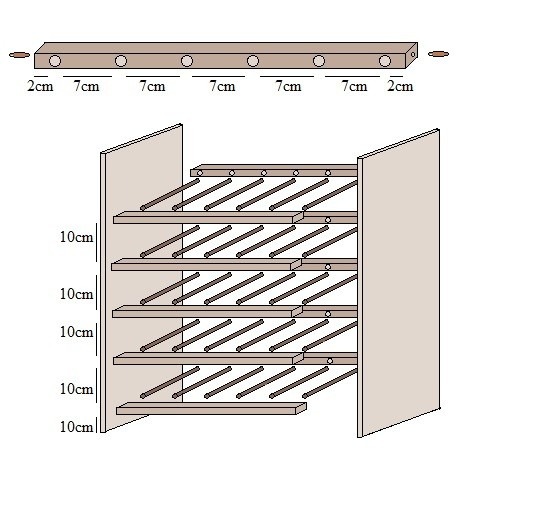
The construction of the wine rack begins with the drilling of the holes, the round rods are glued into the later. For this purpose each of the ten wooden slats is equipped with a total of 6 holes. The holes are drilled deep with a diameter of 1.5cm and 1.5cm. The two outer holes are laid out such that the distance from the side edges of each 2cm is. The distances between the other holes are each 7cm. Are the holes for the rods ready, yet dowel holes have to be worked into the strips. Each bar on each side of the center receives a dowel hole.
2. step: Preparing the sidewalls
If the first step done, the most complex part is already done. In order to assemble the wine rack later, but also the side walls must now be equipped with dowel holes. Each sidewall gets on the inside ten dowel holes. These anchors holes are placed so that the strips flush later front and rear with the side walls and the distances between the strips each 10cm.
Build wine rack itself and store wine in proper style
3. step: Assemble the wine rack
All items are prepared, the wine rack can be assembled. For the dowel holes are filled in one of the side walls with wood glue and fitted with wooden dowels. Then glue is applied to the side edges of the rear strips and the strips are mated with the side wall. Then the rods are glued into the holes provided. Next, the front strip of the row. Here wood glue is applied in the holes and on the side edges and then the strips are placed on the round bars and in the sidewall. The second side wall is glued Finally, and so is the homemade wine rack ready. Once the glue has set, the shelf can be equipped with wine bottles.


0 comments:
Post a Comment